1 star Kayak
|
In our course we learnt the following:
0) parts of a kayak 1) stroke 2) Sweep 3) Draw - classic and J draw 4) Capsize drill and 2 methods of reentry in to kayak 5) rescue operation - 3 methods of rescue operation 6) Embarking and Disembarking from shore and pontoon 7) rear rudder Extras: 1) we had to swim 50m out in to the sea and return back to shore 2) we had to learn how to see saw sea water out of our kayak 3) Deep sea catching 4) kayaking to the Singapore flyer 5) Changing Kayaks while in raft 6) Raft up signal Types of kayaks experienced: 1) Slalom 2) Tourer 3) Dancers 4) A blue kayak (I have no idea what's the name of this kayak) Other kayaks we learnt about: 1) Mega sea kayaks 2) competition kayaks (I'll update the actual names soon) 3) Water polo kayaks |
 A folding Kayak. In 2010-2011, there was a huge flood in the modernized Singapore. A citizen was however seen kayaking in the middle of the floods.
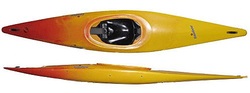
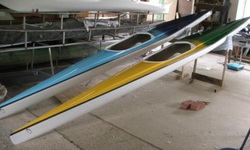
 Dancer Kayaks, used for 2 star kayak practices and training. These kayaks are known to be river kayaks. Unlike sea kayaks, they have great maneuverability, but move slower than their sea buddies
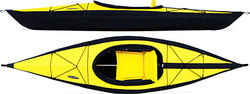
 slalom kayaks are sea kayaks. They move faster than tourers and are used as a racing kayak too.
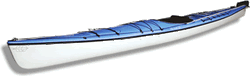 A tourer kayak looks similar to a slalom kayak, unless one knows how to differentiate them. These kayaks are used for long distance travels. They are stable even in bad water conditions.
 Sprint Kayaks are competition kayaks. They are stream line and not easy to move left or right. They move fast in a straight line. A peddle in the kayak allows its user to steer the kayak left or right.
|
Parts of a Kayak
Learning the parts of the kayak is crucial especially if you intend to describe something about your kayaking experience to someone. Imagine saying "The underneath of my kayak hit the curb" compared to "The knell of my kayak hit the curb". Even more relevant when intending to rescue a victim in the sea. Imagine "Hold on to the bow of your kayak, I am coming!" compared to "Hold on to the end of your kayak, I am coming!"
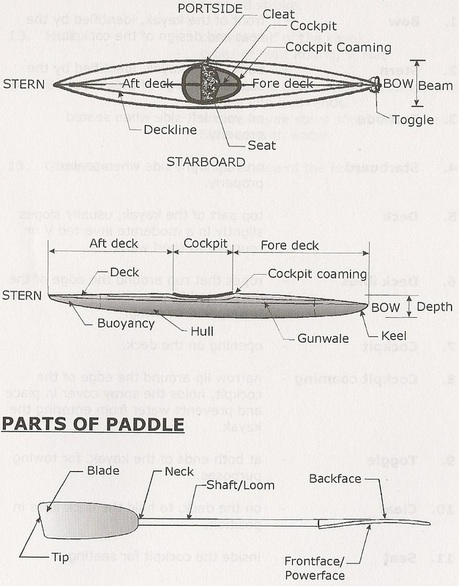
This image is scanned from "1 star handbook" by water venture, Singapore
Stoke move
A stroke move helps to push the kayak forward. It is another term for paddling. However, it is good to note that paddling only occurs on one side of a boat most of the time. To see if one is performing a correct stroke move, neither the paddle nor your hand should hit the sides of the kayak. Another characteristic for a proper stroke would be that when one side of the paddle is in the water, the other side of the paddle can be seen almost perpendicular to the kayak.
Stoke:
1) moves kayak forward
2) neither paddle nor hand touches the side of the kayak
3) when one side of the paddle is in, the other side is seen almost perpendicular to the kayak
Stoke:
1) moves kayak forward
2) neither paddle nor hand touches the side of the kayak
3) when one side of the paddle is in, the other side is seen almost perpendicular to the kayak
Sweep move
The sweep move helps to steer the kayak left or right while on the spot. It definitely works on a moving kayak too.
When performing the sweep move, the hand which is closest to the side of the paddle in the water is extended till it is straight.
The other hand is bent comfortably.
When doing the sweep move, the straight hand should not be using any force. This requires an ideal amount of practice. When done correctly, you will feel like as though the hands are doing nothing but holding the paddle in its position. The kayak however is automatically rotated along a center point, which is where the paddle is inserted in to.
The unique difference between a stroke and sweep is such that in the sweep, the hand which is on the side where the paddle touches the water is extended straight.
When doing a sweep, it is also good to note that the sweep starts from the bow of the kayak and ends at the stern.
Sweep:
1) turns the kayak round on its spot
2) starts from the bow to the stern and then stern to the bow for a constant turning.
3) one arm is to be extended entirely straight
Draw (Classic Draw and J-Draw)
J draw
In the classic draw, the paddle is placed in perpendicular to the side of the kayak. It then pushes water towards the kayak. The move is broken down as such:
1) put paddle in to water with power face facing perpendicular to kayak
2) Push water towards kayak
3) before the paddle comes too close, slide the paddle back till it comes out of the water.
4) repeat step 1 -3 until desired location
Classic Draw
In the J-Draw, the starting is same as the classic draw.
1) put paddle in to water with power face facing perpendicular to kayak
2) push water to kayak
3) before paddle comes too close, turn the power face such that its side faces the kayak. this allows you to slide the paddle back to the starting point without leaving the water
4) when you return to the starting point, turn the paddle such that the power face face kayak again.
5) repeat steps 2-4 until desired location
**Note:
When doing the J-draw, the paddle never leaves the water.
When doing either draws, the hand which is furthest from the paddle in the water remains right in front of the forehead region and never moves.
The grip for both hands do not change before and after the draw
Capsize Drill
The capsize drill is performed in the following format:
1) use paddle to test deepness and safety. ensure there is enough height for you to do the capsize drill
2) Brace yourself. put the paddle to the right or left and hug the kayak
3) turn yourself upside down
4) tap the kayak 3 times.
5) come out from the side of the paddle - you can choose to come out from the other side by dont blame the waves for drifting your paddle a mile away. (:
6) shout for help and raise the paddle high up
7) pull yourself to the bow of the kayak
8) hug the bow and round your legs to the front of the kayak.
9) wait for help
Rescue Operations
The three rescue operations are:
1) Assisted rescue
2) Single person rescue
3) Mass rescue
there are 2 methods in which the capsized person can get back in to the kayak:
1) Slide in method
2) Front sea entry
Single Person Rescue
For simplicity of recalling how rescue works, we will first consider the 'Single Person Rescue'
when you see a kayak which is overturned, go towards the victim who is hanging at the bow of the kayak. (if he isn't... just go to where he is hanging DUH.)
Ask him to pass you anything he is holding, and the bow of his kayak, then move to hold the bow of your kayak.
Rotate his kayak such that it is perpendicular to your kayak, with his kayak's bow closest to your kayak. (Let us assume his kayak is perpendicular on your left)
Drag the front of his kayak such that it is over the comb of your kayak. Continue to drag towards the right until his comb is out of the water. Slide his kayak such that his comb is not over yours (else all the water in his kayak is gonna empty in to yours.)
continue to slide the kayak until due to gravity of the kayak, it tilts down on the right and water comes out of the kayak.
Slide the kayak back to the left until once again gravity makes it tilt down towards the left letting water gush out of the kayak.
Slide the kayak such that its combing is center of your kayak. tell the Victim that you are going to flip the kayak upwards and slide it in to the water.
Flip the kayak upwards such that now the combing is facing up right in front of you.
Slide it back in to the water with the stern facing the front of your kayak so the victim can get back in.
Single Person Rescue summary
1) go to overturned kayak and ask victim to pass you what ever thing he is holding
2) ask victim to move and hold the bow of your kayak
3) hold on the bow of his kayak and rotate until his kayak is perpendicular to your kayak (lets assume it is on your left now)
4) slide his kayak towards your right, until due to gravity, his kayak tilts down on the right letting water come out of the kayak
5) slide it back to the left and allow water to come out again.
6) tell victim you are going to turn his kayak the right side up and slide it in to the water
7) turn it up and slide it in to the water with the stern to the bow of your kayak so its easy for victim to climb back in.
**I felt it was a good idea to put the paddles in between the two kayaks, capsized and yours. The two kayaks prevent them from floating away, and gives you the ease of clearing water off the other kayak
Assisted Rescue
This is exactly the same as 'single person rescue' but this time, two kayaks will raft up together. While one person clears the kayak, the other will hold on to the kayak of the one helping, so as to stabilize the helper's kayak. In Assisted Rescue, The assistant will put one side of the paddle in front of him, while the other side of the paddle is placed behind the helper.
**I felt this was unstable and prevented ease in movement. I recommend putting the paddles in between the kayaks of the helper and the assistant. The paddles wont float off.. you'll have to use your hands to paddle back to some land.
**I also felt this method is not good. Because the assistant's kayak prevents the kayak from tilting down due to gravity. It actually supports the kayak when it wants to tilt.
Mass rescue
What happens if all the kayaks capsize at the same time due to some tsunami?
Well its simple. Praise God...You'll be a citizen of another country...
No no.. There are various techniques to get this done. But the fastest so far has been this:
1) Two person work together.
2) one must ALWAYS hold on to both kayaks.
3) over turn a water filled kayak and slide the other kayak over it. do a see saw allowing ALL WATER to fall in to the water filled kayak.
4) turn the "dried" kayak upwards. Do a one person entry in to the kayak (just deep sea entry, but you gotta know your weight. Don't lean too much on one side)
5) do a one person rescue.
Entry methods
1) Slide in method
In the slide in method, the rescuer will tilt the victim's kayak sideways towards himself. The victim will look towards the sky and put his legs in the cockpit of his kayak, while supporting himself between his kayak and the helper's kayak with his arms. With a quick push, he will then push himself in to the cockpit.
2) Front sea entry method
This method can be used to enter a kayak without assistance. Assuming assistance is given, the victim goes to around the half section from the stern to the cockpit and climbs up such that his stomach lands on the kayak. He then orientates himself such that he faces the cockpit while his legs are separated on each side of the stern, and in the water. Pulling himself towards the cockpit with the combing. When his backside is on the combing, he sits up, sits in the cockpit and puts his legs in.